Warning: Declaration of FEE_Field_Terms::wrap($content, $taxonomy, $before, $sep, $after) should be compatible with FEE_Field_Post::wrap($content, $post_id = 0) in /home/twfs/serverkurabe.com/public_html/blog/wp-content/plugins/front-end-editor/php/fields/post.php on line 0

Warning: Declaration of FEE_Field_Tags::wrap($content, $before, $sep, $after) should be compatible with FEE_Field_Terms::wrap($content, $taxonomy, $before, $sep, $after) in /home/twfs/serverkurabe.com/public_html/blog/wp-content/plugins/front-end-editor/php/fields/post.php on line 0

Warning: Declaration of FEE_Field_Category::wrap($content, $sep, $parents) should be compatible with FEE_Field_Terms::wrap($content, $taxonomy, $before, $sep, $after) in /home/twfs/serverkurabe.com/public_html/blog/wp-content/plugins/front-end-editor/php/fields/post.php on line 0

Warning: Declaration of FEE_Field_Post_Thumbnail::wrap($html, $post_id, $post_thumbnail_id, $size) should be compatible with FEE_Field_Post::wrap($content, $post_id = 0) in /home/twfs/serverkurabe.com/public_html/blog/wp-content/plugins/front-end-editor/php/fields/post.php on line 0

Warning: Declaration of FEE_Field_Post_Meta::wrap($data, $post_id, $key, $ui, $single) should be compatible with FEE_Field_Post::wrap($content, $post_id = 0) in /home/twfs/serverkurabe.com/public_html/blog/wp-content/plugins/front-end-editor/php/fields/post.php on line 0

Warning: Declaration of FEE_Field_Widget::wrap($params) should be compatible with FEE_Field_Base::wrap($content, $data) in /home/twfs/serverkurabe.com/public_html/blog/wp-content/plugins/front-end-editor/php/fields/widget.php on line 0

Warning: Declaration of FEE_Field_Comment::wrap($content) should be compatible with FEE_Field_Base::wrap($content, $data) in /home/twfs/serverkurabe.com/public_html/blog/wp-content/plugins/front-end-editor/php/fields/other.php on line 0

Warning: Declaration of FEE_Field_Term_Field::wrap($content, $term_id, $taxonomy) should be compatible with FEE_Field_Base::wrap($content, $data) in /home/twfs/serverkurabe.com/public_html/blog/wp-content/plugins/front-end-editor/php/fields/other.php on line 0

Warning: Declaration of FEE_Field_Single_Title::wrap($title) should be compatible with FEE_Field_Term_Field::wrap($content, $term_id, $taxonomy) in /home/twfs/serverkurabe.com/public_html/blog/wp-content/plugins/front-end-editor/php/fields/other.php on line 0

Warning: Declaration of FEE_Field_Option::wrap($content, $key, $ui) should be compatible with FEE_Field_Base::wrap($content, $data) in /home/twfs/serverkurabe.com/public_html/blog/wp-content/plugins/front-end-editor/php/fields/other.php on line 0
記事を頻繁に修正する人には、WordPressプラグイン「Front-end Editor」がおすすめ! | Sabakura Blog

記事を頻繁に修正する人には、WordPressプラグイン「Front-end Editor」がおすすめ!

ブログやサイトの記事を作成したあとで、あとから細かな修正や編集を行いたくなることはよくあると思います。その際に、いちいち別ページの編集画面に遷移して、修正して、また確認して……というプロセスを何度も踏むのはとても面倒です。

そこでおすすめしたいのが、WordPressプラグインの「Front-end Editor(フロントエンド・エディタ)」です。このプラグインを導入すると、画面遷移なしでそのまま記事を直接編集できるようになります。

Front-end Editorのインストール

とくに難しい作業はなく、一般的なプラグインのインストール手順で大丈夫です。

  1. プラグイン配布ページである「Front-end Editor | scribu」に行きます。
  2. 右サイドバーの「Download」ボタンから、プラグインをダウンロードします。
  3. ダウンロードした「front-end-editor.2.2.zip」を解凍します。
  4. 解凍したフォルダ内にある「front-end-editor」をWordPressの「plugin」フォルダにFTPでアップロードします。
  5. WordPressにログインし、ダッシュボードを表示します。
  6. 「プラグイン」の項目から、「フロントエンド・エディタ」を有効化します。

Front-end Editorの設定と使い方

Front-end Editorの使い方についてですが、Front-end EditorにはHTMLソースを編集するモードと、HTMLタグやCSSによる修飾がなされた本文を直接編集できるWYSIWYGモードの二通りがあります。
このうち、初期設定ではWYSIWYGモードが有効になっています。

WYSIWYGモード時の使い方

  1. 記事の本文中にマウスポインタを合わせると、左側に「Edit」ボタンが表示されます。
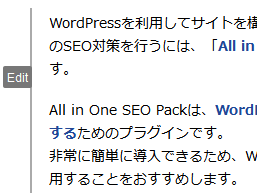
    フロントエンドエディタ編集ボタン
  2. 「Edit」をクリックすると、編集用のWYSIWYGエディタが表示されます。
    フロントエンドエディタ
  3. 「Format」タブでは、文字の太字、イタリック体、下線、リスト、番号付きリスト…など文字に関する装飾が行えます。
  4. 「Inset」タブでは、画像、テーブル、リンクの挿入が行えます。
  5. またエディタ右上の押しピンボタンをクリックすることで、エディタの位置を固定することができます。(固定しないと画面スクロールにあわせて勝手に移動します)
  6. 「保存」をクリックすると編集内容が保存されます。

WYSIWYGモードの注意点

さてWYSIWYGモードは記事が直接編集できて便利なのですが、実を言うと私はほぼ使っていません。これはなぜかというと、現在のFront-end EditorはHTMLタグしか認識してくれないため、たとえば「<?php」のようなコードがあると、「<」が実体参照の「&lt;」に変更されてしまい、PHP部分が動かなくなってしまいます。

また太字や下線といった基本的な装飾は行えるものの、CSSで特定のclassやIDを付与するといった使い方はできません。そのため結局編集画面に移動することが多くなってしまうので、私は最初からHTML編集モードに切り替えて使っています。

HTML編集モードへの切り替え

  1. WordPressのダッシュボードにログインします。
  2. 「設定」の「フロントエンド・エディタ」をクリックします。
  3. 「Enable the WYSIWYG editor.」のチェックを外します。
  4. 「変更を保存」をクリックします。

HTML編集モード時の使い方

HTML編集モードでも、基本的な使い方はWYSIWYG時と変わりません。ただしエディタは表示されないので、直接テキストエリア内を編集する形になります。

  1. 記事の本文中にマウスポインタを合わせると、左側に「Edit」ボタンが表示されます。
    フロントエンドエディタ編集ボタン
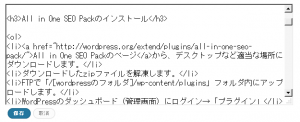
  2. 「Edit」をクリックすると、編集用のテキストエリアが表示されます。
    フロントエンドエディタHTML編集時
  3. 「保存」をクリックすると編集内容が保存されます。

まとめ

私自身は使ってはいませんが、記事内でこまかなclassやIDをつけたりしない、PHPコードなどを本文中に入れないという方には、WYSIWYGモードもとても便利だと思います。

どちらのモードを使うにしても、画面遷移なしで編集できるというのは非常に快適ですので、しょっちゅう記事を修正するという方はぜひ「Front-end Editor」を導入してみてください。