Warning: Declaration of FEE_Field_Terms::wrap($content, $taxonomy, $before, $sep, $after) should be compatible with FEE_Field_Post::wrap($content, $post_id = 0) in /home/twfs/serverkurabe.com/public_html/blog/wp-content/plugins/front-end-editor/php/fields/post.php on line 0

Warning: Declaration of FEE_Field_Tags::wrap($content, $before, $sep, $after) should be compatible with FEE_Field_Terms::wrap($content, $taxonomy, $before, $sep, $after) in /home/twfs/serverkurabe.com/public_html/blog/wp-content/plugins/front-end-editor/php/fields/post.php on line 0

Warning: Declaration of FEE_Field_Category::wrap($content, $sep, $parents) should be compatible with FEE_Field_Terms::wrap($content, $taxonomy, $before, $sep, $after) in /home/twfs/serverkurabe.com/public_html/blog/wp-content/plugins/front-end-editor/php/fields/post.php on line 0

Warning: Declaration of FEE_Field_Post_Thumbnail::wrap($html, $post_id, $post_thumbnail_id, $size) should be compatible with FEE_Field_Post::wrap($content, $post_id = 0) in /home/twfs/serverkurabe.com/public_html/blog/wp-content/plugins/front-end-editor/php/fields/post.php on line 0

Warning: Declaration of FEE_Field_Post_Meta::wrap($data, $post_id, $key, $ui, $single) should be compatible with FEE_Field_Post::wrap($content, $post_id = 0) in /home/twfs/serverkurabe.com/public_html/blog/wp-content/plugins/front-end-editor/php/fields/post.php on line 0

Warning: Declaration of FEE_Field_Widget::wrap($params) should be compatible with FEE_Field_Base::wrap($content, $data) in /home/twfs/serverkurabe.com/public_html/blog/wp-content/plugins/front-end-editor/php/fields/widget.php on line 0

Warning: Declaration of FEE_Field_Comment::wrap($content) should be compatible with FEE_Field_Base::wrap($content, $data) in /home/twfs/serverkurabe.com/public_html/blog/wp-content/plugins/front-end-editor/php/fields/other.php on line 0

Warning: Declaration of FEE_Field_Term_Field::wrap($content, $term_id, $taxonomy) should be compatible with FEE_Field_Base::wrap($content, $data) in /home/twfs/serverkurabe.com/public_html/blog/wp-content/plugins/front-end-editor/php/fields/other.php on line 0

Warning: Declaration of FEE_Field_Single_Title::wrap($title) should be compatible with FEE_Field_Term_Field::wrap($content, $term_id, $taxonomy) in /home/twfs/serverkurabe.com/public_html/blog/wp-content/plugins/front-end-editor/php/fields/other.php on line 0

Warning: Declaration of FEE_Field_Option::wrap($content, $key, $ui) should be compatible with FEE_Field_Base::wrap($content, $data) in /home/twfs/serverkurabe.com/public_html/blog/wp-content/plugins/front-end-editor/php/fields/other.php on line 0
VirtualPC上の仮想マシン(CentOS)をVMwareに変換する | Sabakura Blog

VirtualPC上の仮想マシン(CentOS)をVMwareに変換する

VMware

これまでVirtualPC上にCentOSを入れて運用していたのですが、VMwareの方が軽いという話を聞いて乗り換えてみました。(まあ、実はほとんどの場合SSHで接続してCUIで使うのであんまり軽さは関係ないのですが、VMwareの勉強も兼ねまして)

さて、とはいえ環境はなるべくならばそのまま移行したいので、VirtualPCの仮想マシンをそのままVMwareに変換してみました。

ネット上にも参考資料がちらほらありましたが、詳細な手順がなかなか見つからなかったので、ここで詳しい手順をまとめておきます。

仮想マシンのディスクを変換する

VirtualPCでは、仮想マシンのディスクは「.vhd」という拡張子のファイルです。
まずは、これをVMwareのディスクである「.vmdk」形式に変換する必要があります。
この作業のためには「NHC」と呼ばれるソフトを使います。

NHCの使い方

  1. NHCのサイトへ行きます。
  2. 「NHC Ver.0 alpha40A 2011/05/14 32bit版」をダウンロードします。
  3. ダウンロードしたファイルを解凍し、フォルダ内の「NHC.EXE」を起動します。
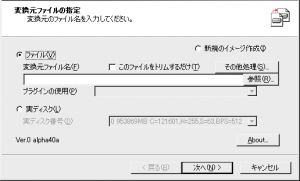
  4. 「変換元ファイルの指定」で「ファイル」にチェックを入れます。
  5. 「参照」ボタンをクリックし「.vhd」ファイルを選択します。
    VMwareへの変換その1
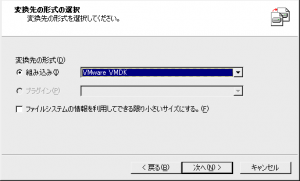
  6. 「変換先の形式の選択」で「組み込み」にチェックを入れ、リストボタンから「VWwareVMDK」を選択します。
    VMwareへの変換その2
  7. 「VMware VMDK形式変の変換」に関してはとくに変更せずに「次へ」進みます。
  8. 「変換先ファイル名」に「.vmdk」をつけたファイル名を入力します。
  9. 「次へ」をクリックすると変換が始まります。

VirtualPCの設定ファイルをVMware用に変換する

上記でディスクそのものの変換は完了しましたが、個別の設定に関してはさらにVirtualPCの設定ファイル「.vmc」をVMware用の「.vmx」に変換する必要があります。

これにはVMwareの公式サイトから「VMware vCenter Converter Standalone」というソフトをダウンロードして使います。
VMware製品をはじめて利用する場合はユーザー登録が必要ですので、その手順もあわせて説明します。

VMware vCenter Converter Standaloneのダウンロード

  1. 「VMware vCenter Converter Standalone」のページへ行きます。
  2. (VMware製品をはじめて利用する場合は)ユーザー登録を行います。
  3. 登録後届いたメールからユーザーをアクティベートします。
  4. 同じくもう一通届いているメールから、ソフトのダウンロードページへ移動します。
  5. ダウンロードしたファイルをダブルクリックで起動してインストールします。

VMware vCenter Converter Standaloneの利用

  1. プログラム一覧から「VMware vCenter Converter Standalone」を起動します。
  2. 「マシンの変換」をクリックします。
  3. 「ソースのタイプを選択」で「バックアップイメージまたはサードパーティ仮想マシン」を選択します。
  4. 「参照」ボタンから「.vmc」ファイルを選択します。
  5. 「ターゲットのタイプを選択」で「VWwareWorkStationまたはその他のVMware仮想マシン」を選択します。
  6. 「VMware製品の選択」で「VMware Player 3.0.x」を選択します。
  7. 「参照」ボタンから仮想マシンのフォルダを選択します。
  8. 「オプション」の「ネットワーク」の「接続タイプ」で「NAT」を選択します。
    ※NATを選ぶとホストOSと共通のIPアドレスが割り振られます。
  9. 「サマリ」で変換内容を確認したあと「終了」をクリックすると変換が始まります。

VMware Playerの利用

ここまででVirtualPCからの変換作業は完了です。
最後にVMwarePlayerをインストールし、仮想マシンを起動します。

VMware Playerのダウンロード

  1. VMwarePlayerのページへ行きます。
  2. 「ダウンロード」へ進むと登録メールアドレスへメールが配信されます。
  3. 届いたメールからアクティベートを行います。
  4. 届いたメール内の「VMware Playerのダウンロード」からダウンロードページへ進みます。
  5. 「VMware Player (32 ビットおよび 64 ビット版 Windows 用)」をダウンロードします。
  6. ダウンロードしたファイルをダブルクリックで起動してインストールします。
  7. インストール完了後再起動を求められるので、再起動します。

VMware Playerの利用

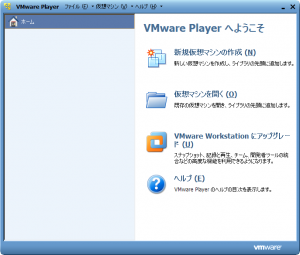
  1. プログラム一覧から「VMware Player」を起動します。
  2. 「仮想マシンを開く」をクリックします。
    VMwareの起動
  3. 作成済みの「.vmx」ファイルを選択すると、左ペインのライブラリ一覧に仮想マシンが追加されます。
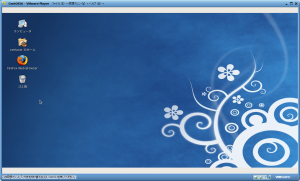
  4. 再生したい仮想マシンを選び「仮想マシンの再生」をクリックすると、仮想マシンが起動します。